


初始化项目~
使用 pnpm 管理依赖
使用 pnpm 创建项目,管理依赖和打包项目。
$ npm instal-g pnpm @antfu/ni
$ pnpm create vite PROJECT_NAME
$ cd PROJECT_NAME
$ ni
$ nr dev
如果使用 nvm 管理 node 环境可以搭配 direnv 自动激活环境:
16.14
#!/bin/bash
layout node

if [ -f "$(which nvm)" ]; then
  nvm use $NODE
elif [ -f "$HOME/.config/nvm/nvm.sh" ]; then
  . $HOME/.config/nvm/nvm.sh && nvm use $NODE
fi
配置检查工具
配置 eslint
ESLint 用来检查代码是否规范。
安装
$ pnpm add -D eslint
$ pnpm eslint --init
# How would you like to use ESLint? · problems
# What type of modules does your project use? · esm
# Which framework does your project use? · vue
# Does your project use TypeScript? · Yes
# Where does your code run? · browser
# What format do you want your config file to be in? · JSON
# Would you like to install them now? Yes
# Which package manager do you want to use? · pnpm
在 VSCode 中安装 ESLint 扩展后可以实时看到检查结果。
配置
下面是自动生成的 .eslintrc.js 配置文件,暂时不需要修改啥:
module.exports = {
    "env": {
        "browser": true,
        "es2021": true
    },
    "extends": [
        "plugin:vue/essential",
        "airbnb-base"
    ],
    "parserOptions": {
        "ecmaVersion": "latest",
        "parser": "@typescript-eslint/parser",
        "sourceType": "module"
    },
    "plugins": [
        "vue",
        "@typescript-eslint"
    ],
    "rules": {
    }
}
使用
通过 ESLint 扩展可以实时看到检查结果。
通过执行下列命令可以手动检查规范:
$ pnpm eslint "./**/*"
忽略
新建 .eslintignore 文件
node_modules
dist
types
.vscode
.husky
*.woff
*.ttf
*.sh
*.scss
*.css
*.svg
*.png
报错
检查出的报错大致可以分为两类:基本报错和与 vue 相关的报错。
基础格式
基本报错(例如缩进宽度不一致)可以通过手动调整代码格式解决,但是这里我们不需要一个一个的去改,而是使用格式化工具(下文的 Prettier)自动格式化代码。
vue 相关
下面是检出的与 vue3 新特性相关的错误:
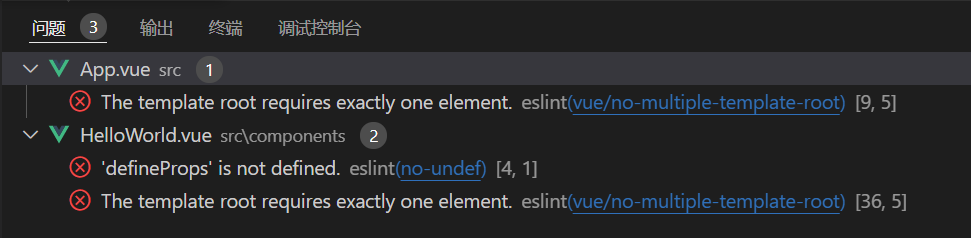
The template root requires exactly one element
报错原因:eslint 不能识别 script setup 的多根模板。
解决办法:将配置文件中的 plugin:vue/essential 更改为 plugin:vue/vue3-essential 即可
module.exports = {
    ...
    extends: [
        'plugin:vue/vue3-essential',
        'airbnb-base',
        'plugin:prettier/recommended',
    ],
    ...
}
'defineProps' is not defined
报错原因:eslint 不能识别全局宏,例如 defineProps 等。
解决办法:在配置文件中添加一个环境 vue/setup-compiler-macros 即可
module.exports = {
    env: {
        browser: true,
        es2021: true,
        'vue/setup-compiler-macros': true,
    },
    ...
}
配置 stylelint
对样式进行规范检查。
安装
需要的依赖:
- stylelint
- stylelint-config-standard:规则
- stylelint-config-prettier:关闭所有不必要或可能与 Prettier 冲突的规则
- stylelint-order:控制 css 顺序的规则插件,我们可以在
rules中通过order/properties-order传入一个 css 属性数组 - stylelint-config-recess-order:css 顺序的配置,一份写好的配置好的属性列表,格式化时,会按这个顺序来排序
- stylelint-scss:适配预处理器语法的插件
$ pnpm add -D stylelint stylelint-config-standard stylelint-config-prettier stylelint-order stylelint-config-recess-order stylelint-scss
安装 VSCode 扩展 Stylelint。
配置
在 .stylelintrc.js 中对 stylelint 进行配置。
module.exports = {
    root: true,
    plugins: ['stylelint-order', 'stylelint-scss'],
    extends: [
        'stylelint-config-standard',
        'stylelint-config-prettier',
        'stylelint-config-recess-order',
    ],
    rules: {
        // 不要使用已被 autoprefixer 支持的浏览器前缀
        'media-feature-name-no-vendor-prefix': true,
        'at-rule-no-vendor-prefix': true,
        'selector-no-vendor-prefix': true,
        'property-no-vendor-prefix': true,
        'value-no-vendor-prefix': true,
    },
}
忽略
只检查 .css 文件和 .scss 文件,编辑 .stylelintignore 文件:
/dist
/public
*.*
!*.css
!*.scss
配置 prettier
Prettier 用来格式化代码。
安装
$ pnpm add -D prettier
在 VSCode 中安装 Prettier 扩展快捷格式化。
该扩展会自动读取 .prettierrc.js 中的配置,还可配置保存时自动格式化。
配置
添加一些必要的配置到 .prettierrc.js 文件:
module.exports = {
    printWidth: 80, //单行长度
    tabWidth: 4, //缩进长度
    useTabs: false, //使用空格代替tab缩进
    semi: false, //句末使用分号
    singleQuote: true, //使用单引号
    trailingComma: 'es5', // 多行时尽可能打印尾随逗号
    bracketSpacing: true, // 在对象前后添加空格-eg: { foo: bar }
    arrowParens: 'avoid', //单参数箭头函数参数周围使用圆括号-eg: (x) => x
    vueIndentScriptAndStyle: false, //不对vue中的script及style标签缩进
    endOfLine: 'lf', //结束行形式
    // 包裹文字时候结束标签的结尾尖括号掉到了下一行
    htmlWhitespaceSensitivity: 'ignore',
}
使用
使用 VSCode 扩展或者手动格式化:
$ pnpm prettier --write "./**/*"
忽略
在 .prettierignore 中配置。
冲突
Prettier 格式化的代码不一定符合 ESLint 的规范,所以还需要解决二者之间的冲突:
$ pnpm add -D eslint-plugin-prettier eslint-config-prettier
然后在 .eslintrc.js 文件中增加 plugin:prettier/recommended 规范:
module.exports = {
    ...
    extends: [
        'plugin:vue/essential',
        'airbnb-base',
        'plugin:prettier/recommended',
    ],
    ...
}
注意,plugin:prettier/recommended 需要放到最后。
理论上,使用 Prettier 重新格式化整个项目后所有 ESLint 报错都能消失。
安装 husky
husky 继承了 git 的所有钩子,在触发对应 git 事件时,husky 可以阻止不合法的 commit,push 等。
例如在 commit 前执行 eslint 校验,commit 时检查 commit message 等。
$ pnpm add -D husky
启用 git hooks:
$ pnpm husky install
这将在项目根目录下生成一个 .husky/_/husky.sh 文件。
对于配置者来说,husky install 是手动执行的。但是对于其它使用者,更友好的方式是在执行 pnpm install 时自动执行 husky install。
实现上述需求只需要在 package.json 的 scripts 中添加了一条:
{
  "scripts": {
    "prepare": "husky install"
  }
}
prepare意味着该条命令会在npm install之后执行。
配置 commitlint
在多人协作时,commitlint 能够强制提交者遵守提交约定。
需要先安装 husky。
安装
$ pnpm add -D @commitlint/cli @commitlint/config-conventional
配置
新建 commitlint.config.js 配置文件:
module.exports = {
  extends: ['@commitlint/config-conventional']
}
使用:检查提交日志
当执行 git commit -m "xxxx" 时,检查 "xxxx" 是否符合规范。
下面的命令生成 .husky/commit-msg 钩子文件,该文件不需要我们做任何修改!
$ pnpm husky add .husky/commit-msg 'pnpm commitlint --edit "$1"'
在 commitlint.config.js 配置文件中配置一些校验规则:
module.exports = {
    extends: ['@commitlint/config-conventional'],
    rules: {
        // 必须加上指定的消息类型,例如 "fix: xxx"
        'type-enum': [2, 'always', ['feat','fix','docs','style','refactor','test','chore']],
    },
}
每个 rule 的值由三部分组成:
- 日志等级:0 (disable), 1 (warning), 2 (error)
- 是否应用:always, never
- 该 rule 的值
type-enum: 强制提交消息带上类型
一个规范的提交消息格式:type(scope?): subject
## 一个带有类型的提交消息
# fix: some message
## 一个带有可选参数的提交消息,该参数可以用来标识此次提交主要涉及到代码中哪个模块
# fix(user): some message
## 可以指定多个值
# fix(user/sample/task): some message
commitlint-config-conventional 包中提供的默认类型有:
const types = [
    'fix', // 修补bug
    'feat', // 新功能(feature)
    'docs', // 文档(documentation)
    'style', // 格式(不影响代码运行的变动)
    'refactor', // 重构(即不是新增功能,也不是修改bug的代码变动)
    'test', // 增加测试
    'chore', // 不属于以上类型的其他类型(日常事务)
    'build', // 主要目的是修改项目构建系统(例如 glup,webpack,rollup 的配置等)的提交
    'ci', // 主要目的是修改项目继续集成流程(例如 Travis,Jenkins,GitLab CI,Circle等)的提交
    'perf', // 性能优化
    'revert', // 回滚某个更早之前的提交
]
常用的有:feat, fix, docs, style, refactor, test, chore。
配置 lint-staged
提交代码时,只对修改的文件进行检查和修复。
安装
$ pnpm add -D lint-staged
配置
新建 .lintstagedrc 文件:
{
    "*.vue": "eslint --fix",
    "*.{js,jsx,ts,tsx}": "eslint --fix",
    "*.{htm,html,css,sss,less,scss,sass}": "stylelint --allow-empty-input --fix"
}
在提交前检查:
$ pnpm husky add .husky/pre-commit 'pnpm lint-staged --allow-empty "$1"'
使用
无需主动使用,git commit 时自动按需检查代码规范。
配置路径别名
我们通常用 @ 来表示 src 目录。
配置别名,不仅需要让 vite 知道,还需要让 typescript 编译器知道,因此需要在 vite 和 ts 编译器的配置文件中都进行配置。
配置 vite
在 vite.config.js 文件中添加
export default {
    //...
    alias: {
        '@': path.resolve(__dirname, 'src')
    }
}
上面的语句中涉及到两个知识点:path.resolve 和 __dirname,这两个东西需要添加这个包(如果报错的话):
$ pnpm add --dev @types/node
然后:
import * as path from 'path'
// or
import { resolve } from 'path'
当然还可以添加一些常见的目录别名,但似乎没有必要:
{
    '~api': resolve(__dirname, 'src/api'),
    '~utils': resolve(__dirname, 'src/utils'),
    '~store': resolve(__dirname, 'src/store'),
    '~pages': resolve(__dirname, 'src/pages'),
    '~types': resolve(__dirname, 'src/types'),
    '~components': resolve(__dirname, 'src/components'),
}
在 vite 中配置之后,应用能够正常运行,但是编辑器不能正确识别路径,因为 ts 编译器尚未配置。
配置 typescript
在 tsconfig.json 中添加:
{
	"baseUrl": ".",
    "paths": {
        "@/*": ["src/*"],
    }
}
每一个在 vite 中配置的 alias 都需要在 ts 中再配置一遍!
配置环境变量
Vite 的环境变量暴露在 import.meta.env 对象上:
MODE: string运行模式:"development"|"production"BASE_URL: string部署应用时的基本 URLPROD: boolean应用是否运行在生产环境ENV: boolean应用是否运行在开发环境
配置环境变量的文件优先级从低到高:
- .env
- .env.local
- .env.[mode]
- .env.[mode].local
默认情况下,只有以 VITE_ 开头的 自定义环境变量 才会被正确暴露出去,例如
VITE_BASE_API=localhost:3000- ……
为环境变量配置类型提示:新建 src/env.d.ts 文件(好像作用不大?)
/// <reference types="vite/client" />

declare interface ImportMetaEnv {
	readonly VITE_BASE_API: string
	// 更多环境变量...
}

// eslint-disable-next-line no-unused-vars
declare interface ImportMeta {
	readonly env: ImportMetaEnv
}
配置文件路由
vite-plugin-pages 搭配 vue-router 实现文件路由。
安装 vue-router
$ pnpm add -D vue-router@next
这里因为使用文件路由,先不做任何配置。
安装 vite-plugin-pages
vite-plugin-pages 插件可以根据文件结构生成路由列表。
默认情况下,视图文件应该存放在 src/pages 目录下。
安装插件:
$ pnpm add -D vite-plugin-pages
注册 vite-plugin-pages
import Pages from 'vite-plugin-pages'
Pages() // to plugins
挂载 router
这里不再在 src/router 中管理路由,而是直接在 main.ts 中添加:
import { createRouter, createWebHistory } from 'vue-router'
import routes from 'virtual:generated-pages' // or ~generated-pages
const router = createRouter({
    history: createWebHistory(),
    routes,
})
app.use(router)
解决虚拟模块报错
virtual:generated-pages 是一个虚拟模块,eslint 和 ts 都会提示找不到这个东西。
首先 eslint 提示的是:
Unable to resolve path to module 'virtual:generated-pages'. eslint(import/no-unresolved)
我们直接在 eslint 配置文件中关闭这个选项:
{
  rules: {
    // 部分 from 子句不是标准的 ES6 语法,例如路径别名、虚拟模块等
    // ts 编译器本身就会检查这些 from 子句并给出提示,这里关闭 eslint 检查
    'import/no-unresolved': 'off',
  }
}
然后 ts 提示的是
找不到模块“virtual:generated-pages”或其相应的类型声明。ts(2307)
解决办法是
{
  "compilerOptions": {
    "types": ["vite-plugin-pages/client"]
  }
}
默认文件结构
默认情况下,vite-plugin-pages 插件将 src/pages 目录作为存放视图组件文件的根目录
/=> src/pages/index.vue/users=> src/pages/users.vue or src/pages/users/index.vue/users/:id=> src/pages/users/[id].vue- ...
可能需要禁用 eslint 的 vue/multi-word-component-names 规则,该规则要求 vue 文件的名称必须是多个单词。
配置布局系统
需要安装 vite-plugin-vue-layouts 插件,它与 vite-plugin-pages 插件搭配使用。
安装
$ pnpm add -D vite-plugin-vue-layouts
注册
import Layouts from 'vite-plugin-vue-layouts'
Layouts() // to plugins
配置
修改路由
import { createRouter, createWebHistory } from 'vue-router'
import { setupLayouts } from 'virtual:generated-layouts'
import routes from 'virtual:generated-pages'
const router = createRouter({
    history: createWebHistory(),
    routes: setupLayouts(routes),
})
app.use(router)
类型声明
{
  "compilerOptions": {
    "types": ["vite-plugin-vue-layouts/client"]
  }
}
切换布局
布局系统资源存放在 src/layouts 目录下
新布局需要重启应用。
页面内启用新布局:
<route lang="yaml">
meta:
  layout: custom
</route>
配置状态管理
使用 Pinia 而不是 Vuex 进行状态管理。
安装
$ pnpm add pinia@next
配置
修改 main.ts:
/** 使用 Pinia 进行状态管理 */
import { createPinia } from 'pinia'
const pinia = createPinia()
app.use(pinia)
示例
新建
新建 src/store 目录用于存放管理状态的 API。
以 user 模块为例,新建 src/store/user.ts 文件:
import { defineStore } from 'pinia'

// 必要的类型注解
interface UserRecordRaw {
    firstName: string
    secondName: string
    age: number
}

// 必要的状态类型注解
interface State {
    users: UserRecordRaw[]
}

export const useUserStore = defineStore({
    id: 'userState',
    // 状态集合应该在箭头函数中返回
    state: (): State => ({
        users: [],
    }),
    // 定义计算属性
    getters: {
        numUsers(): number {
            return this.users.length
        },
    },
    // 异步/同步动作
    actions: {
        getAdultUsers() {
            return this.users.filter(u => u.age >= 18)
        },
        async loadAllUsers() {
            const userApi = { getAll: async () => ({ data: { users: [] } }) }
            const r = await userApi.getAll()
            this.users = r.data.users
            return this.users
        },
    },
})
使用
在页面组件中引入组合式状态管理 API:
<script setup lang="ts">
import { useUserStore } from '~store/user'

const userStore = useUserStore()
console.log(userStore.numUsers)
</script>
安装 VueRequest
安装
$ pnpm add vue-request
配置
三种配置方式:为全局配置、为组件配置、为方法配置,优先级依次升高。
import { setGlobalOptions } from 'vue-request'

setGlobalOptions({ /* options */ })
使用
const { data, loading, error, ... } = useRequest(service)
配置模拟数据
使用 mockjs 搭配 vite-plugin-mock 插件实现模拟请求。
但是我安装 vite-plugin-mock 插件时提示它依赖于 rollup,所以需要一起安装。
安装
$ pnpm add mockjs
$ pnpm add -D rollup vite-plugin-mock
配置
import { viteMockServe } from 'vite-plugin-mock'

viteMockServe({
    // mockPath: 'mock', // 模拟.ts文件的存储文件夹
    // watchFiles: true, // 监视mockPath对应的文件夹内文件中的更改
    // logger: true, // 在控制台显示请求日志
    // supportTs: true, // 读取 ts 文件模块,无法监视.js文件
    // ignore: undefined, // 自动读取模拟.ts 文件时,忽略指定格式的文件
    // localEnabled: process.env.NODE_ENV === 'development',
    // prodEnabled: process.env.NODE_ENV === 'production',
})

AutoImport({
    imports: [
        //...
        {
            'vue-request': [
                'useRequest',
                'usePagination',
            ]
        }
    ]
})
几乎所有选项用默认值就行了。
新建
在项目目录下(不是 src 目录下)新建 mock 目录存放模拟响应,例如
import { MockMethod } from 'vite-plugin-mock'

export default [
    {
        url: '/api/get',
        method: 'get',
        response: () => {
            return {
                code: 0,
                data: {
                    name: 'vben',
                    age: 27,
                    height: 170,
                },
            }
        },
    },
] as MockMethod[]
使用
最后就可以在页面中使用啦
<template>
    <div>data: {{ data }}</div>
    <div>loading: {{ loading }}</div>
    <div>error: {{ error }}</div>
</template>

<script setup lang="ts">
const { data, loading, error } = useRequest('/api/get')
</script>
心得
网上很多教程太老了,vite2 用 mock 其实很简单
配置自动引入
自动引入 API
使用 unplugin-auto-import 插件自动从某些包中引入 API,例如 vue 中的 ref、computed 等。
安装
$ pnpm add -D unplugin-auto-import
配置
配置参考:https://github.com/antfu/unplugin-auto-import#configuration
import AutoImport from 'unplugin-auto-import/vite'

export default defineConfig({
    plugins: [
        // https://github.com/antfu/unplugin-auto-import#configuration
        AutoImport({
            // 需要自动导入的文件:ts, vue, md
            include: [/\.ts$/, /\.vue$/, /\.md$/],
            // 注册需要全局导入的api
            imports: [
                // 已经预设了全局导入的包
                'vue',
                'vue-router',
                // 需要自己定义全局导入规则的包
                {
                    // 自己写的模块也可以全局导入
                    // import { useUserStore } from '~store/user'
                    '~store/user': ['useUserStore'],
                    // 安装的模块亦可以设置全局导入
                    'axios': [
                        // 还可以为默认导出设置别名
                        ['default', 'axios']
                    ]
                },
            ],
            // ts项目最好在src下生成auto-import.d.ts文件
            dts: 'src/auto-import.d.ts',
            // 生成 .eslintrc-auto-import.json 文件,消除 eslint 报错
            eslintrc: {
                // 启用该功能,默认为 fasle,需要改为 true 才能生效
                enabled: true,
                // 生成的文件路径
                filepath: './.eslintrc-auto-import.json',
                // true | false | 'readonly' | 'readable' | 'writable' | 'writeable'
                globalsPropValue: true,
            },
            // custom resolvers
            resolvers: [/*...*/]
        })
  ],
})
下面是配置示例:
import { defineConfig } from 'vite'
import AutoImport from 'unplugin-auto-import/vite'

// https://vitejs.dev/config/
export default defineConfig({
    plugins: [
        // https://github.com/antfu/unplugin-auto-import#configuration
        AutoImport({
            include: [/\.ts$/, /\.vue$/, /\.md$/],
            imports: [
                'vue',
                'vue-router',
                {
                    '~store/user': ['useUserStore'],
                },
            ],
            dts: 'src/auto-import.d.ts',
            eslintrc: {
                enabled: true,
                filepath: './.eslintrc-auto-import.json',
                globalsPropValue: true,
            },
        }),
    ],
})
报错
eslint 和 ts 会报错。
完成上述配置之后,重启应用和编辑器,正常情况下应该生成下面两个文件:
- .eslintrc-auto-import.json:用于兼容 eslint 检查
- src/auto-import.d.ts:用于兼容 ts 编译器检查
将 "./.eslintrc-auto-import.json" 规范加入到 eslint 的 extends 里面。
tsconfig.json 的 compilerOptions.types 配置了 "src/**/*.d.ts" 之后会自动加载 src/auto-import.d.ts 的内容,如果没有自动加载,重启编辑器。
生成的 src/auto-import.d.ts 可能引起 eslint 报错,将其添加到 .eslintignore 中即可。
自动引入组件
unplugin-vue-components 插件可以实现组件和资源的按需自动引入。
安装
$ pnpm add -D unplugin-vue-components
配置
import AutoComponents from 'unplugin-vue-components/vite'

AutoComponents({
    dts: 'src/auto-components.d.ts',
}) // to plugins
dts
dts 为 TypeScript 生成类型注解,默认位置为 ./components.d.ts
确保生成的 src/auto-components.d.ts 位于 tsconfig.json 的 include 中。
将生成的 src/auto-components.d.ts 添加到 .eslintignore 中。
将生成的 src/auto-components.d.ts 添加到 .gitignore 中。
resolvers
unplugin-vue-components 内置了一些 UI 库的解析器。
import AutoComponents from 'unplugin-vue-components/vite'
import { NaiveUiResolver } from 'unplugin-vue-components/resolvers'

AutoComponents({
    resolvers: [
        NaiveUiResolver(),
    ]
})
自动引入图标
安装 [unplugin-icons][01] 并配合 unplugin-vue-components 实现图标的自动导入。
安装
$ pnpm add -D unplugin-icons
配置
import AutoComponents from 'unplugin-vue-components/vite'
import Icons from 'unplugin-icons/vite'
import IconsResolver from 'unplugin-icons/resolver'

AutoComponents({ resolvers: [ IconsResolver() ] })
Icons()
将 unplugin-icons 插件添加到 vite 的插件列表中。
在 unplugin-vue-component 插件的 resolvers 配置项中添加 unplugin-icons 的自动导入解析器。
设置自动导入后,会在 auto-components.d.ts 文件中从虚拟文件中导入图标组件,例如
declare module 'vue' {
  export interface GlobalComponents {
    IMdiAbTesting: typeof import('~icons/mdi/ab-testing')['default']
  }
}
使用
格式为 i-{collection}-{some-icon-name},例如
<template>
    <i-mdi-ab-testing />
</template>
报错
此时,ts 解析器不能识别 ~icon/* 模块,需要在 ts 解析器配置中加入关于此虚拟模块的类型说明:
{
  "compilerOptions": {
    "types": [
      "unplugin-icons/types/vue3",
    ]
  }
}
插件选项
默认的配置已经完全够用了。
scale(number) 相对于 1rem 进行缩放defaultStyle(string) 将样式应用于图标defaultClass(string) 将样式类应用于图标compiler('vue2 '| 'vue3 '| 'jsx')jsx('react' | 'preact')
解析器选项
图标组件的默认名称是 i--。
prefix (string) 选项可以设置前缀,默认是 'i'。
prefix: false 可以禁用前缀,即名称变为 -。
enabledCollections (string[]) 只启用某些图标集,例如['mdi'],默认启用全部。
alias ({[collection: string]: string}) 设置图标集的别名。
安装图标库
该插件使用的图标库是 Iconify,该图标库集成了众多的图标源,可以全部安装,也可以按需安装。
全部安装
$ pnpm add -D @iconify/json
~120MB 大小的资源,推荐用 pnpm 安装,一次安装,多个项目都可以使用。
按需安装
只安装自己需要的图标源,例如 Material Design Icons:
$ pnpm add -D @iconify-json/mdi
按需安装的格式为 @iconify-json/{ICON_SET_ID},具体的图标源可以在官方搜索引擎上看到。
图标源的具体 ID 可以在对应图标源的子页面 URL 上看到,参考 [Material Design Icons] 的搜索页面。
本地图标
该插件还可以用来加载本地图标,但是我们已经配置 vite-svg-loader 插件了。
引用本地资源
引入SVG
vite-svg-loader 插件能够让我们像引用组件那样引用 SVG 文件。
安装
$ pnpm add -D vite-svg-loader
配置
import svgLoader from 'vite-svg-loader'

svgLoader()
/// <reference types="vite-svg-loader" />
使用
三种导入方式:
导入为 URL
import iconUrl from './my-icon.svg?url'
// '/assets/my-icon.2d8efhg.svg'
导入为字符串
import iconRaw from './my-icon.svg?raw'
// '<?xml version="1.0"?>...'
导入为组件
import IconComponent from './my-icon.svg?component'
// <IconComponent />
一个例子
<template>
	<MyIcon />
</template>

<script setup lang="ts">
import MyIcon from './my-icon.svg'
</script>
引入位图 *
vite-plugin-vue-images 插件,暂未集成,因为没有提供相关的 resolver。
vite-plugin-vue-images 插件用来自动导入图片。
安装
$ pnpm add -D vite-plugin-vue-images
注册
import VueImages from 'vite-plugin-vue-images'

export default {
    plugins: [
        VueImages({
            // 配置图片存放位置,下面是默认值
            dirs: ['src/assets/img'],
            // 配置支持自动导入的图片的类型,下面是默认值
            extensions: ['jpg', 'jpeg', 'png', 'svg', 'webp'],
            // 自定义文件名到组件名的解析器,默认为 hello-world => HelloWorld 格式
            customResolvers: [],
            // 不知道干嘛的参数
            customSearchRegex: '([a-zA-Z0-9]+)'
        })
    ]
}
使用
<template>
    <img :src="HelloWorld" />
</template>

<script setup lang="ts">
    // 将会自动导入下面这个
    // import HelloWorld from '@/assets/img/hello-world.png'
</script>
问题
该插件自动导入图片资源,但是导入的资源在 ts 中会报错,提示找不到资源。
该插件尚未提供相关的 resolver 给 vite-plugin-components 插件生成全局导入。
添加顶部进度条
nprogress 包可实现这个功能。
安装
$ pnpm add nprogress
$ pnpm add -D @types/nprogress
配置
切换路由时显示进度条:
/** NProgress */
// index.html 中通过 #nprogress .bar 修改进度条颜色
import NProgress from 'nprogress'
import 'nprogress/nprogress.css'
NProgress.configure({
    // 进度环
    showSpinner: true,
    // 动画效果,例如淡入淡出等
    easing: 'ease', // linear, ease-in, ease-out, ease-in-out., cubic-bezier
    speed: 500, // 动画速度
    // 最低百分比
    minimum: 0.3,
})
router.beforeEach((to, from, next) => {
    NProgress.start()
    next()
})
router.afterEach(() => {
    NProgress.done()
})
修改进度条颜色:
<html>
    <head>
        <style>
            #nprogress .bar {
                background: red !important;
            }
        </style>
    </head>
</html>
进度控制:
NProgress.set(0.4) // 40%
@vueuse/integrations/useNProgress 实现了对 NProgress 的响应式绑定。
vite-plugin-md2vue
安装
$ pnpm add -D vite-plugin-md2vue
配置
import vitePluginMd2Vue from 'vite-plugin-md2vue'
vitePluginMd2Vue()
declare module '*.md' {
    import type { DefineComponent } from 'vue'
    const component: DefineComponent<{}, {}, any>
    export default component
}
使用
import TestMd from './test.md'
vite-plugin-restart
通过监听文件修改,自动重启 vite 服务。[github]
修改某些文件,需要重启才能生效,例如 vite.config.js 和 .env.development 文件。
安装
$ pnpm add -D vite-plugin-restart
配置
import ViteRestart from 'vite-plugin-restart'
ViteRestart({ restart: ['vite.config.ts', '.env.development'] })
生产环境时移除console
export default defineConfig({
    build: {
        minify: 'terser',
        terserOptions: {
            compress: {
                // 生产环境时移除console
                drop_console: true,
                drop_debugger: true,
            },
        },
    },
})
组件库
Naive UI
安装 UI 和字体
$ pnpm add -D naive-ui vfonts
/** 为 Naive UI 导入 vfonts 字体 */
import 'vfonts/Lato.css'
import 'vfonts/FiraCode.css'
安装 xicons 图标库:https://github.com/07akioni/xicons#icons-installation
$ pnpm add -D @vicons/fluent @vicons/ionicons4 @vicons/ionicons5 @vicons/antd @vicons/material @vicons/fa @vicons/tabler @vicons/carbon @vicons/utils
因为前面配置了自动引入,所以 UI 组件不需要全局引入,也不需要直接引入,直接在模板中使用即可。
图标组件还是需要直接引入,他也应该被直接引入。
图标库
xicons
参考 Naive UI 的安装。
iconify
参考 unplugin-icons 的安装。
样式库
Windi CSS
一个功能优先的 CSS 框架。这货与 Tailwind CSS 非常相似,但是更快、更强。
安装
$ pnpm add -D windicss vite-plugin-windicss
配置
import WindiCSS from 'vite-plugin-windicss'

WindiCSS()
import 'virtual:windi.css'
现在功能类和指令已经能够在项目中正常解析了。
但是写模板时还缺少一些提示,VSCode 安装 WindiCSS IntelliSense 即可。
属性模式:https://windicss.org/features/attributify.html
Tailwind CSS *
使用 Windi CSS 即可。
工具库
lodash
鲁大师必装。
VueUse
封装大量常见 Hooks,必装。
测试框架 *
单元测试 Vitest
略。
有趣的特性
隐藏 ref 的 .value 写法
通过给创建 ref 的 API 加上 $ 前缀,使其返回 reactive 的响应式变量,例如
$ref$computed$shallowRef$customRef$toRef
$() 可以将对对象的 ref 代理结构为 reactive 代理,或者将已经存在的 ref 代理转换为 reactive 代理。
$$() 可以屏蔽这种“转换”,它可以访问原始 ref 代理。
这是一个实验特性,其使用也有诸多限制。
启用
需要手动启用:vue({ reactivityTransform: true })
然后将 /// <reference types="vue/macros-global" /> 添加到 env.d.ts 中
使用
const name = $ref('barwe')
console.log(name) // barwe
注意
这个特性只有自己用才保险,很多第三方的 Hooks 可能不支持。要将转换过的响应式变量传入第三方 Hooks,可以使用 $$() 获取原始 ref 代理。
在 script setup 标签上设置 name 属性
vite-plugin-vue-setup-extend 插件支持在 script setup 标签上设置 name 属性。
使用 keep-alive 时需要指定组件的 name 属性。
安装:
$ pnpm add -D vite-plugin-vue-setup-extend
注册:
import VueSetupExtend from 'vite-plugin-vue-setup-extend'

export default {
    plugins: [
        VueSetupExtend()
    ]
}
使用:
<script setup lang="ts" name="SomeComponentName"></script>
其他插件
vite-plugin-pwa渐进式网页应用,似乎可以用 vue-request 代替vite-plugin-inspect在学习、创作和调试插件时才用得到,检查插件的中间状态vite-plugin-cesium基于 WebGL 的地图引擎vite-plugin-restart修改指定文件时重启应用 [ref]vite-plugin-md2vue将 MarkDown 文档导出为 Vue3 组件 [ref]vite-plugin-imagemin压缩图片
vite 插件大全:http://www.guofeian.cn/article_details/647258913514991616#toc35
评论区